enuSpace Meta를 통한 가상세계에 접속해 보세요. 데모입니다.
'enuSpace Meta' 카테고리의 다른 글
| enuSpace Meta 소개 (0) | 2023.08.11 |
|---|
enuSpace Meta를 통한 가상세계에 접속해 보세요. 데모입니다.
| enuSpace Meta 소개 (0) | 2023.08.11 |
|---|
enuSpace Meta를 통한 가상세계에 접속해 보세요. 데모입니다.
| 바이오헬스 메타 (0) | 2023.08.18 |
|---|
Tensorflow r1.5 윈도우10에서 C++ 컴파일 수행기 (x64)
Tensorflow r1.3 버젼에서는 CUDA Toolkit 8을 이용하였으나, Tensorflow 1.5 Version에서는 CUDA Toolkit 9를 찾음.
D:\Workspace\tensorflow\tensorflow\contrib\cmake\build> D:\Workspace\tensorflow\tensorflow\contrib\cmake\build> D:\Workspace\tensorflow\tensorflow\contrib\cmake\build> D:\Workspace\tensorflow\tensorflow\contrib\cmake\build> D:\Workspace\tensorflow\tensorflow\contrib\cmake\build>cmake .. -A x64 -DCMAKE_BUILD_TYPE=Release ^ More? -DSWIG_EXECUTABLE=D:/Workspace/swigwin-3.0.10/swigwin-3.0.10/swig.exe ^ More? -DPYTHON_EXECUTABLE=C:/Anaconda3/python.exe ^ More? -DPYTHON_LIBRARIES=C:/Anaconda3/libs/python35.lib ^ More? -Dtensorflow_ENABLE_GPU=ON ^ More? -DCUDNN_HOME="D:\Workspace\cudnn-8.0-windows10-x64-v5.1\cuda" ^ More? -Dtensorflow_WIN_CPU_SIMD_OPTIONS=/arch:AVX -- Building for: Visual Studio 14 2015 -- The C compiler identification is MSVC 19.0.24215.1 -- The CXX compiler identification is MSVC 19.0.24215.1 -- Check for working C compiler: C:/Program Files (x86)/Microsoft Visual Studio 14.0/VC/bin/x86_amd64/cl.exe -- Check for working C compiler: C:/Program Files (x86)/Microsoft Visual Studio 14.0/VC/bin/x86_amd64/cl.exe -- works -- Detecting C compiler ABI info -- Detecting C compiler ABI info - done -- Check for working CXX compiler: C:/Program Files (x86)/Microsoft Visual Studio 14.0/VC/bin/x86_amd64/cl.exe -- Check for working CXX compiler: C:/Program Files (x86)/Microsoft Visual Studio 14.0/VC/bin/x86_amd64/cl.exe -- works -- Detecting CXX compiler ABI info -- Detecting CXX compiler ABI info - done -- Detecting CXX compile features -- Detecting CXX compile features - done -- Performing Test COMPILER_OPT_ARCH_NATIVE_SUPPORTED -- Performing Test COMPILER_OPT_ARCH_NATIVE_SUPPORTED - Failed -- Performing Test COMPILER_OPT_WIN_CPU_SIMD_SUPPORTED -- Performing Test COMPILER_OPT_WIN_CPU_SIMD_SUPPORTED - Success CMake Error at C:/Program Files/CMake/share/cmake-3.6/Modules/FindPackageHandleStandardArgs.cmake:148 (message): Could NOT find CUDA: Found unsuitable version "8.0", but required is at least "9.0" (found C:/Program Files/NVIDIA GPU Computing Toolkit/CUDA/v8.0) Call Stack (most recent call first): C:/Program Files/CMake/share/cmake-3.6/Modules/FindPackageHandleStandardArgs.cmake:386 (_FPHSA_FAILURE_MESSAGE) C:/Program Files/CMake/share/cmake-3.6/Modules/FindCUDA.cmake:958 (find_package_handle_standard_args) CMakeLists.txt:278 (find_package) -- Configuring incomplete, errors occurred! See also "D:/Workspace/tensorflow/tensorflow/contrib/cmake/build/CMakeFiles/CMakeOutput.log". See also "D:/Workspace/tensorflow/tensorflow/contrib/cmake/build/CMakeFiles/CMakeError.log". |
CUDA Toolkit 9.1 다운 및 설치
https://developer.nvidia.com/cuda-downloads
cudnn-9.1-windows10-x64-v7 다운 및 압축 해제후, CUDA Toolkit 디렉토리에 복사 수행
https://developer.nvidia.com/rdp/cudnn-download
Cmd 명령수행
"C:\Program Files (x86)\Microsoft Visual Studio 14.0\VC\bin\amd64\vcvars64.bat"
set PATH=%PATH%;C:\Program Files\Git\bin\
cd D:\Workspace\tensorflow\tensorflow\contrib\cmake\build
cmake .. -A x64 -DCMAKE_BUILD_TYPE=Release ^
-DSWIG_EXECUTABLE=D:/Workspace/swigwin-3.0.10/swigwin-3.0.10/swig.exe ^
-DPYTHON_EXECUTABLE=C:/Anaconda3/python.exe ^
-DPYTHON_LIBRARIES=C:/Anaconda3/libs/python35.lib ^
-Dtensorflow_ENABLE_GPU=ON ^
-DCUDNN_HOME="C:\Program Files\NVIDIA GPU Computing Toolkit\CUDA\v9.1" ^
-DCUDA_SDK_ROOT_DIR="C:\Program Files\NVIDIA GPU Computing Toolkit\CUDA\v9.1" ^
-Dtensorflow_WIN_CPU_SIMD_OPTIONS=/arch:AVX
Cmd 창으로 돌아와 컴파일 빌드 수행.
D:\...\build> MSBuild /p:Configuration=Release tf_tutorials_example_trainer.vcxproj
빌드 수행후 에러 발생 -> math_functions.hpp를 찾지 못하였다고 나오는 경우.
Visual Studio를 이용하여 프로젝트 오픈후 tf_core_gpu_kernels 프로젝트에 Include 디렉토리에
C:\Program Files\NVIDIA GPU Computing Toolkit\CUDA\v9.1\include\crt 추가수행후 재시도
D:\...\build> Release\tf_tutorials_example_trainer.exe
-------------------------------------------------------------------------------------------------------------------------------------------------
Tensorflow C++ r1.3에서 r1.5로 변경작업. (enuSpace-Tensorflow)
Tensorflow r1.5를 이용하여 tf_tutorials_example_tranier의 환경중 참조된 Object Libraries를 복사 수행.
- Visual studio 프로젝트 솔루션에서 tf_tutorials_example_trainer의 Object Libraries를 복사 및 붙여넣기 수행. (release용 obj파일 적용)
빌드 수행시 에러
1>D:\Workspace\tensorflow\tensorflow/core/platform/default/mutex.h(25): fatal error C1083: Cannot open include file: 'nsync_cv.h': No such file or directory
- D:\Workspace\tensorflow\tensorflow\contrib\cmake\build\nsync\install 하위 디렉토리에 include, lib 디렉토리 존재
- D:\Workspace\tensorflow\tensorflow\contrib\cmake\build\nsync\install\include 디렉토리 Additional Include Directories에 추가 수행
- D:\Workspace\tensorflow\tensorflow\contrib\cmake\build\nsync\install\lib\nsync.lib 를 Additional Dependencies에 추가 수행.
1>summary_db_writer.obj : error LNK2001: unresolved external symbol sqlite3_bind_blob64
- D:\Workspace\tensorflow\tensorflow\contrib\cmake\build\sqlite\install 하위 디렉토리에 include, lib 디렉토리 존재
- D:\Workspace\tensorflow\tensorflow\contrib\cmake\build\sqlite\install\include 디렉토리 Additional Include Directories에 추가 수행
- D:\Workspace\tensorflow\tensorflow\contrib\cmake\build\sqlite\install\lib\sqlite.lib 를 Additional Dependencies에 추가 수행.
1>port.obj : error LNK2001: unresolved external symbol "void __cdecl snappy::RawCompress(char const *,unsigned __int64,char *,unsigned __int64 *)" (?RawCompress@snappy@@YAXPEBD_KPEADPEA_K@Z)
- D:\Workspace\tensorflow\tensorflow\contrib\cmake\build\snappy\src\snappy\Release\snappy.lib 를 Additional Dependencies에 추가 수행.
1>cuda_dnn.obj : error LNK2001: unresolved external symbol cudnnSetConvolutionMathType
- C:\Program Files\NVIDIA GPU Computing Toolkit\CUDA\v9.1\lib\x64\cudart_static.lib // 8.0에서 9.1로 변경
- C:\Program Files\NVIDIA GPU Computing Toolkit\CUDA\v9.1\lib\x64\cuda.lib // 8.0에서 9.1로 변경
- C:\Program Files\NVIDIA GPU Computing Toolkit\CUDA\v9.1\lib\x64\cublas.lib // 8.0에서 9.1로 변경
- C:\Program Files\NVIDIA GPU Computing Toolkit\CUDA\v9.1\lib\x64\cublas_device.lib // 8.0에서 9.1로 변경
- C:\Program Files\NVIDIA GPU Computing Toolkit\CUDA\v9.1\lib\x64\cufft.lib // 8.0에서 9.1로 변경
- C:\Program Files\NVIDIA GPU Computing Toolkit\CUDA\v9.1\lib\x64\curand.lib // 8.0에서 9.1로 변경
- C:\Program Files\NVIDIA GPU Computing Toolkit\CUDA\v9.1\extras\CUPTI\libx64\cupti.lib // 8.0에서 9.1로 변경
- C:\Program Files\NVIDIA GPU Computing Toolkit\CUDA\v9.1\lib\x64\cusolver.lib // 8.0에서 9.1로 변경
- C:\Program Files\NVIDIA GPU Computing Toolkit\CUDA\v9.1\lib\x64\cudnn.lib // 8.0에서 9.1로 변경
1>tf_cc.lib(while_gradients.obj) : error LNK2001: unresolved external symbol "class tensorflow::Status __cdecl tensorflow::ops::BuildWhileLoop(class tensorflow::Scope const &,class std::vector<class tensorflow::Output,class std::allocator<class tensorflow::Output> > const &,class std::function<class tensorflow::Status __cdecl(class tensorflow::Scope const &,class std::vector<class tensorflow::Output,class std::allocator<class tensorflow::Output> > const &,class tensorflow::Output *)> const &,class std::function<class tensorflow::Status __cdecl(class tensorflow::Scope const &,class std::vector<class tensorflow::Output,class std::allocator<class tensorflow::Output> > const &,class std::vector<class tensorflow::Output,class std::allocator<class tensorflow::Output> > *)> const &,class std::basic_string<char,struct std::char_traits<char>,class std::allocator<char> > const &,class std::vector<class tensorflow::Output,class std::allocator<class tensorflow::Output> > *,bool,class tensorflow::Output *)" (?BuildWhileLoop@ops@tensorflow@@YA?AVStatus@2@AEBVScope@2@AEBV?$vector@VOutput@tensorflow@@V?$allocator@VOutput@tensorflow@@@std@@@std@@AEBV?$function@$$A6A?AVStatus@tensorflow@@AEBVScope@2@AEBV?$vector@VOutput@tensorflow@@V?$allocator@VOutput@tensorflow@@@std@@@std@@PEAVOutput@2@@Z@6@AEBV?$function@$$A6A?AVStatus@tensorflow@@AEBVScope@2@AEBV?$vector@VOutput@tensorflow@@V?$allocator@VOutput@tensorflow@@@std@@@std@@PEAV45@@Z@6@AEBV?$basic_string@DU?$char_traits@D@std@@V?$allocator@D@2@@6@PEAV56@_NPEAVOutput@2@@Z)
실행중 No gradient defined for op: MatMul 오류 메세지 나타날경우
- D:\Workspace\tensorflow\tensorflow\contrib\cmake\build\tf_cc.dir\Release\math_grad.obj // Object Libraries에 추가
- D:\Workspace\tensorflow\tensorflow\contrib\cmake\build\tf_cc.dir\Release\nn_grad.obj // Object Libraries에 추가
- D:\Workspace\tensorflow\tensorflow\contrib\cmake\build\tf_cc.dir\Release\array_grad.obj // Object Libraries에 추가
tf_core_kernels (one_hot_op가 포함되지 않은 경우, 포함하여 빌드 수행.
- D:\Workspace\tensorflow\tensorflow\core\kernels\one_hot_op.cc
- D:\Workspace\tensorflow\tensorflow\core\kernels\one_hot_op.h
- D:\Workspace\tensorflow\tensorflow\contrib\cmake\build\tf_core_kernels.dir\Release\one_hot_op.obj // Object Libraries에 추가
Add Object Libraries (포함되지않은 obj 파일이 있는 경우 포함하여 빌드 수행.
- tf_core_kernels.dir\Release\sparse_fill_empty_rows_op.obj
- tf_core_kernels.dir\Release\sparse_reduce_op.obj
- tf_core_kernels.dir\Release\sparse_slice_op.obj
------------------------------------------------------------------------------------------------------------------------------------------------
| enuSpace Tensorflow(텐서플로우)를 이용한 XOR 학습 구현 (0) | 2017.12.14 |
|---|---|
| MNIST linear regression training 결과 (0) | 2017.12.08 |
| Tensorflow를 이용한 MNIST linear regression 구현 (그래픽 블럭-enuSpace) (1) | 2017.12.08 |
| Tensorflow를 이용한 GradientDescent 구현 (그래픽 블럭) (0) | 2017.10.20 |
| Tensorflow (r1.3) 윈도우10에서 C++ 컴파일 방법 (0) | 2017.08.22 |
Python 참고 : https://aimatters.wordpress.com/2016/01/16/solving-xor-with-a-neural-network-in-tensorflow/
Python 참고 : http://blog.aloni.org/posts/backprop-with-tensorflow/
XOR dataset
Cost 계산 Algorithm
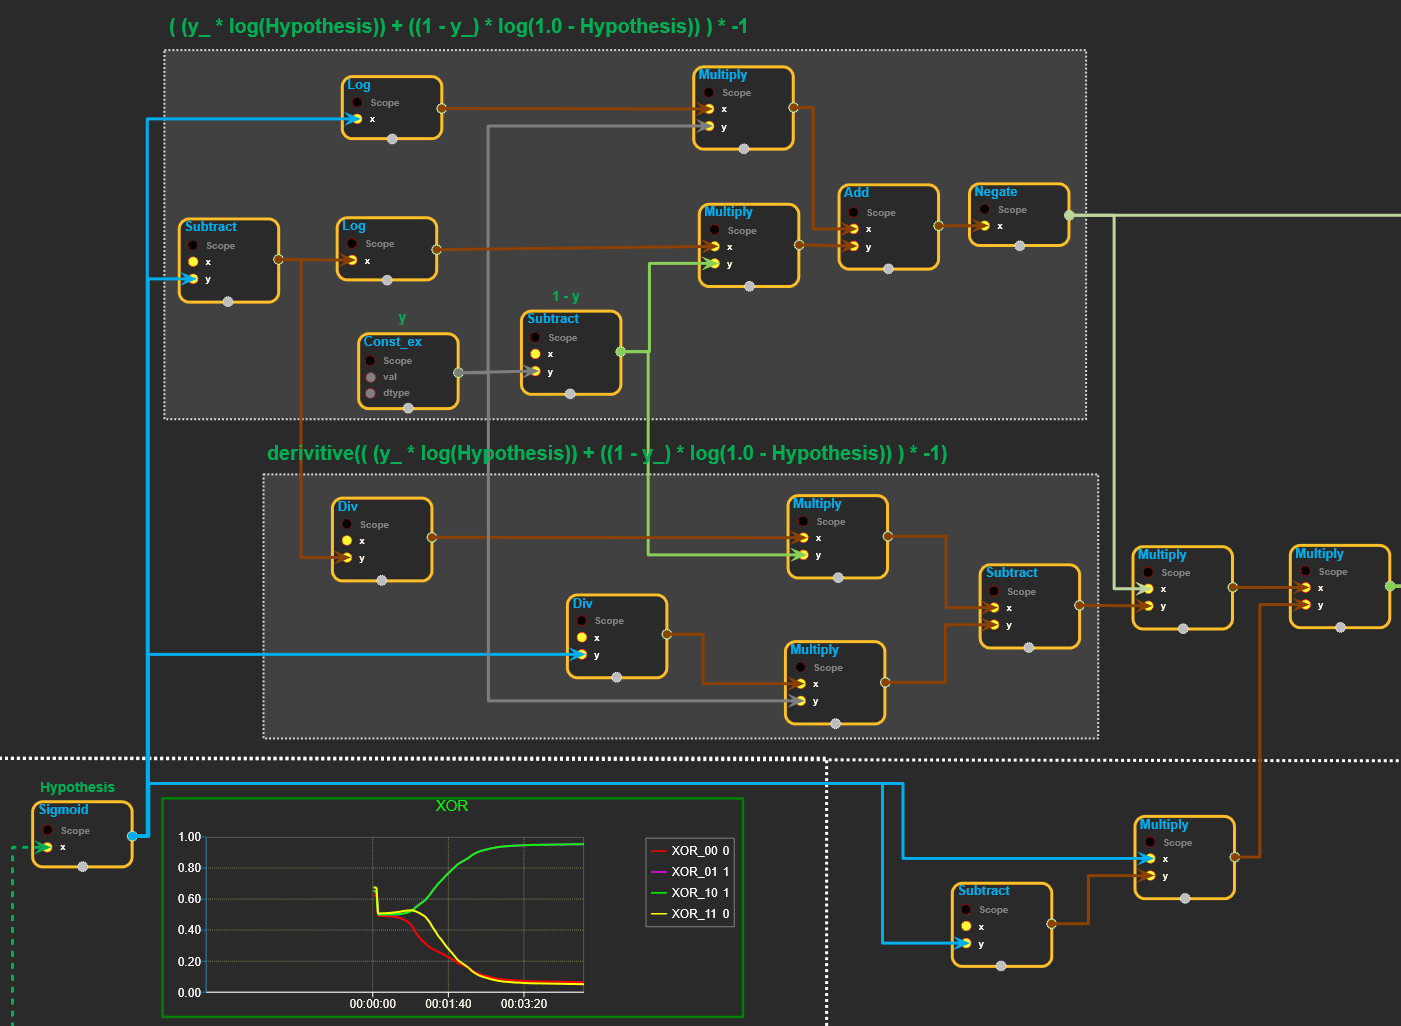
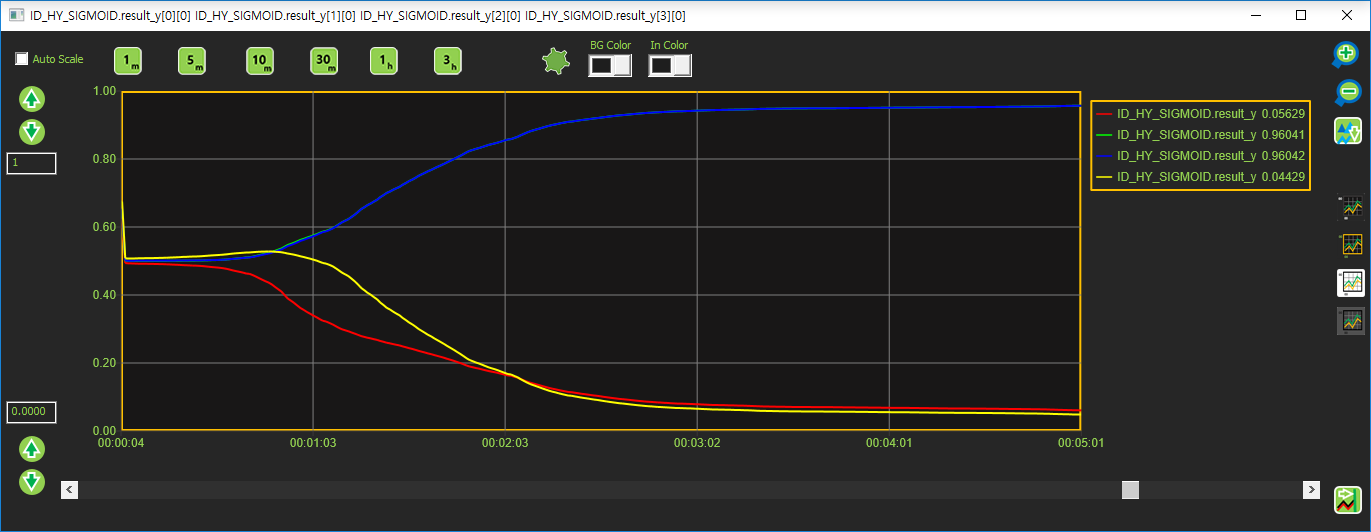
Sigmoid 출력값
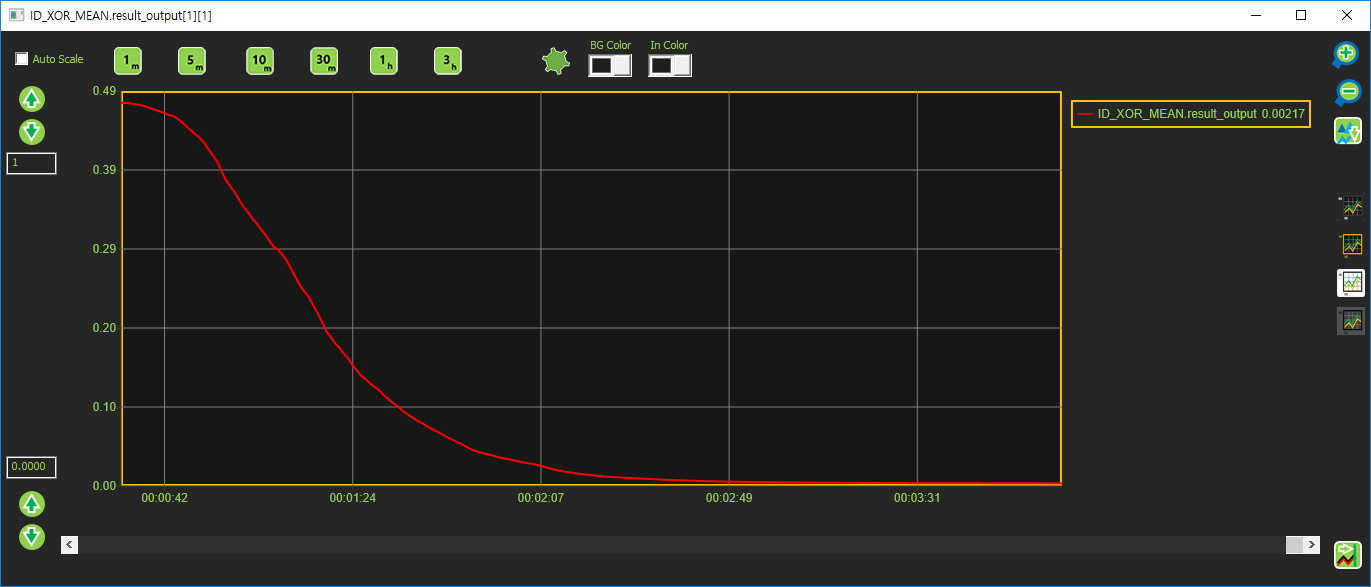
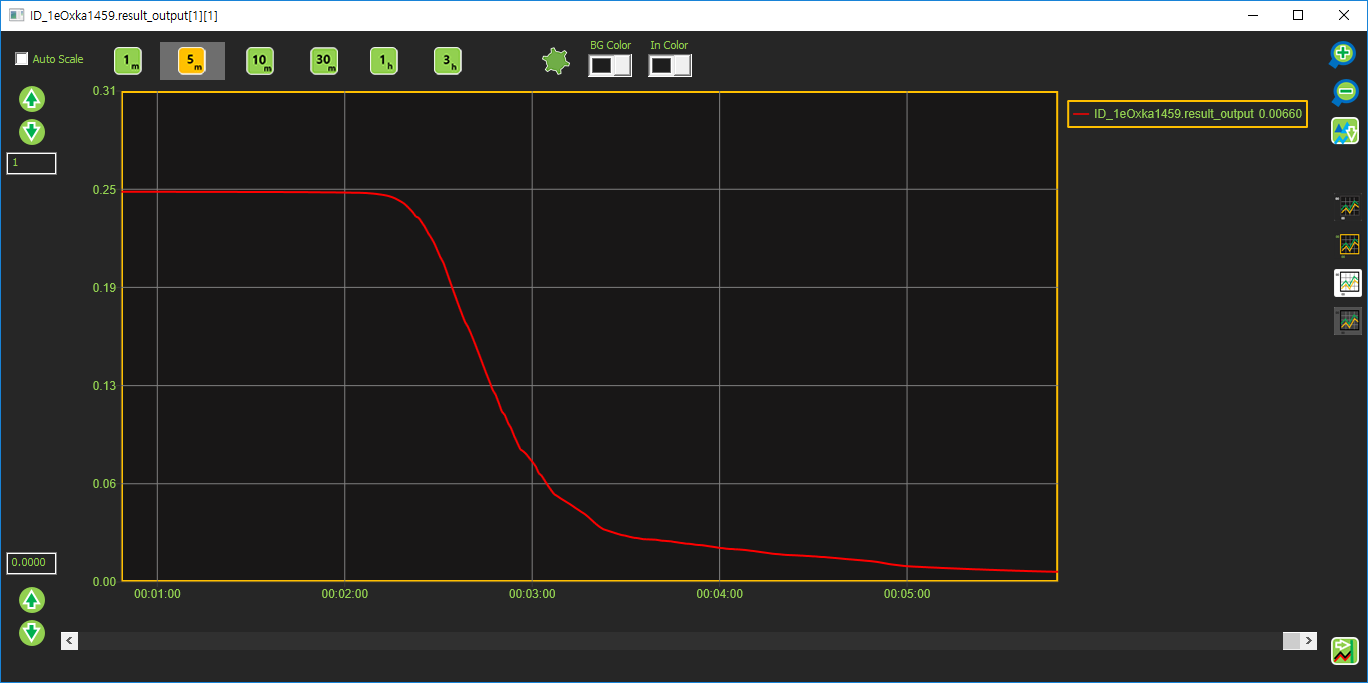
Cost 출력 값
Model 2
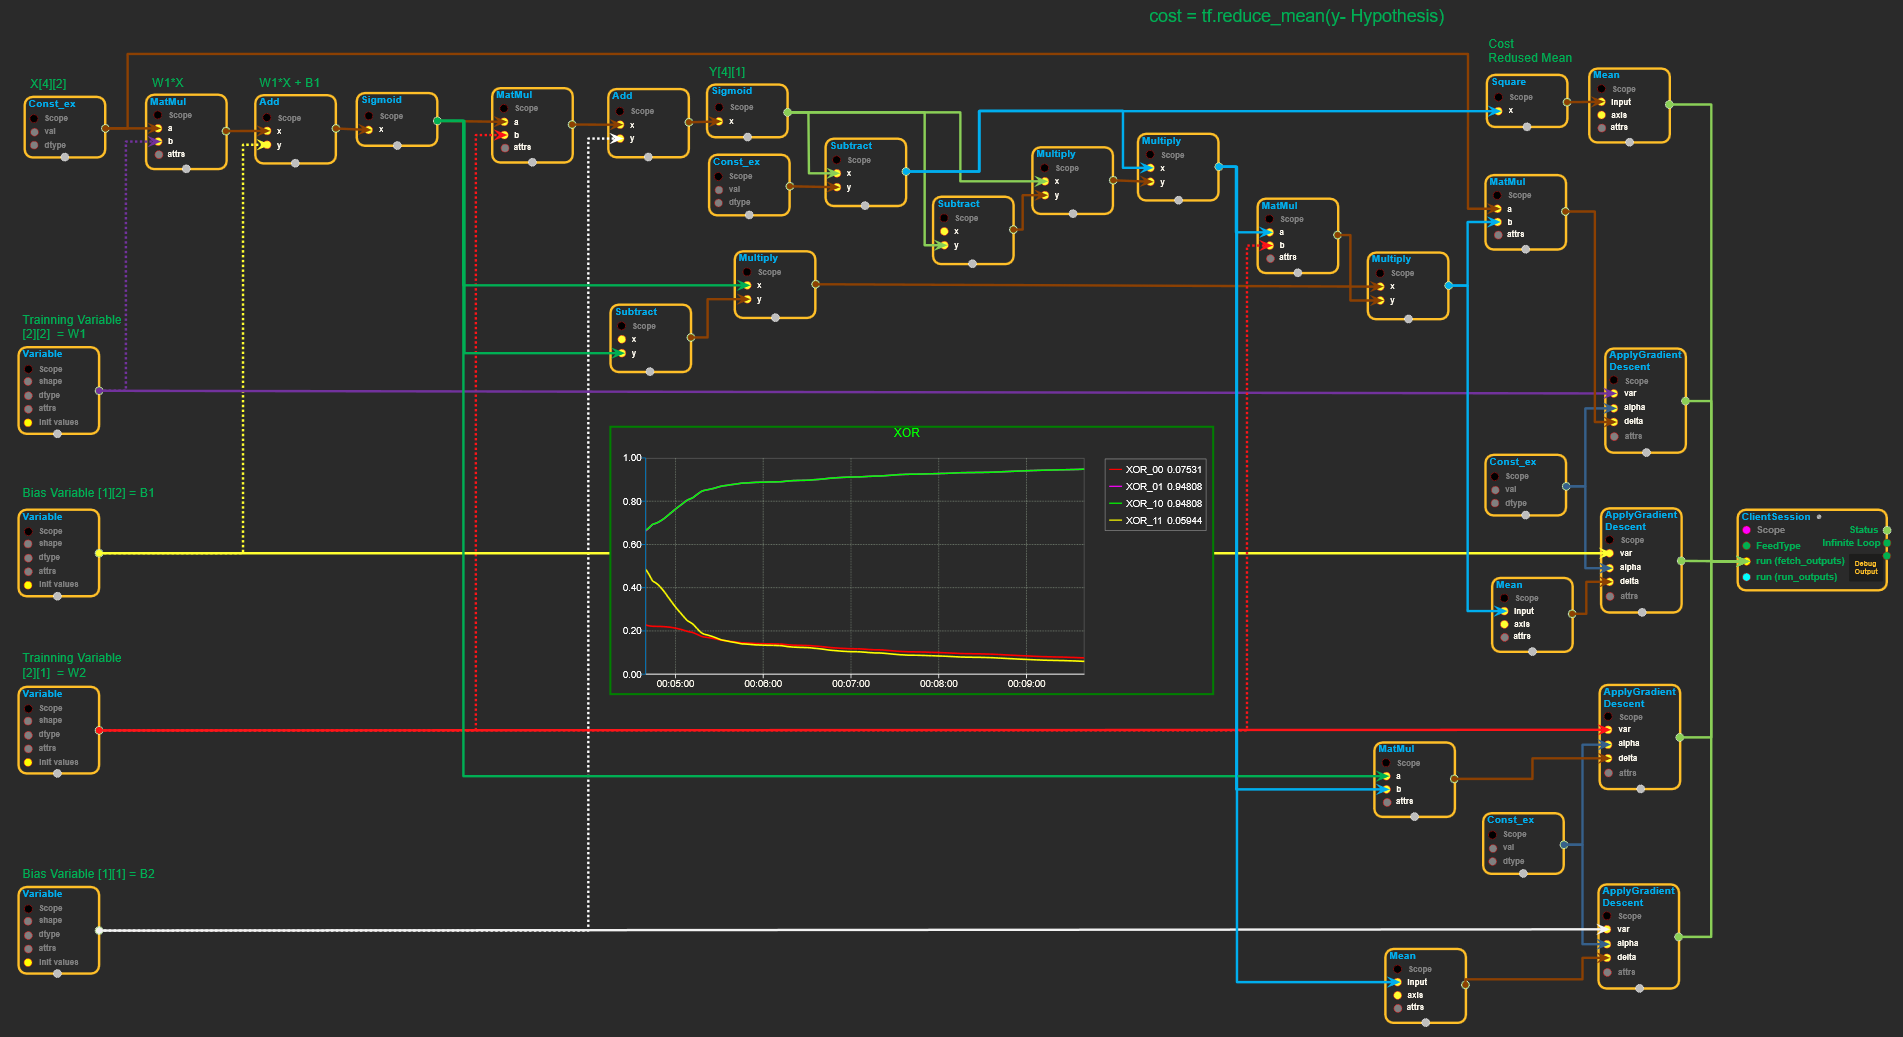
Cost 계산 Algorithm
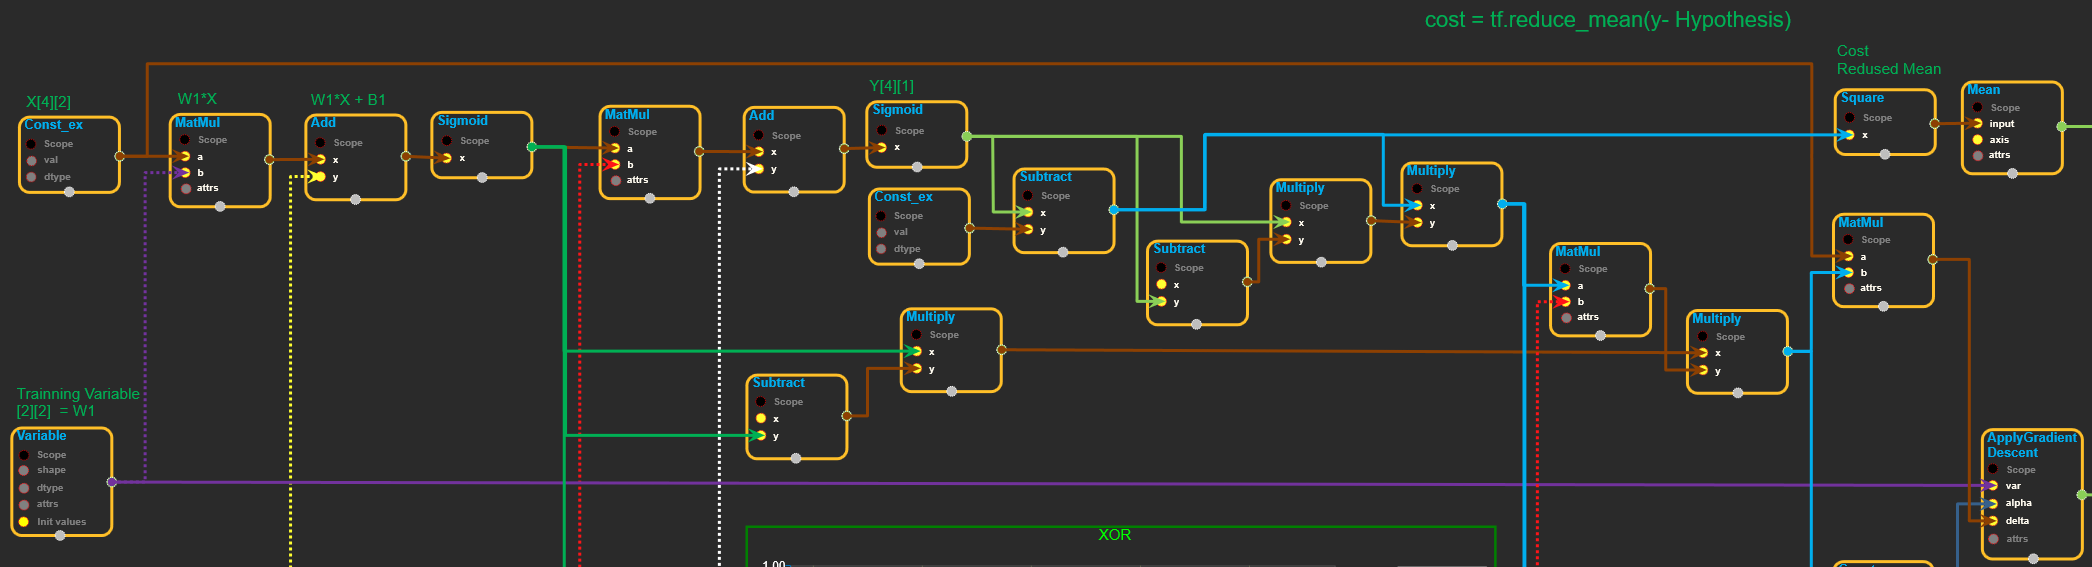
Sigmoid 값
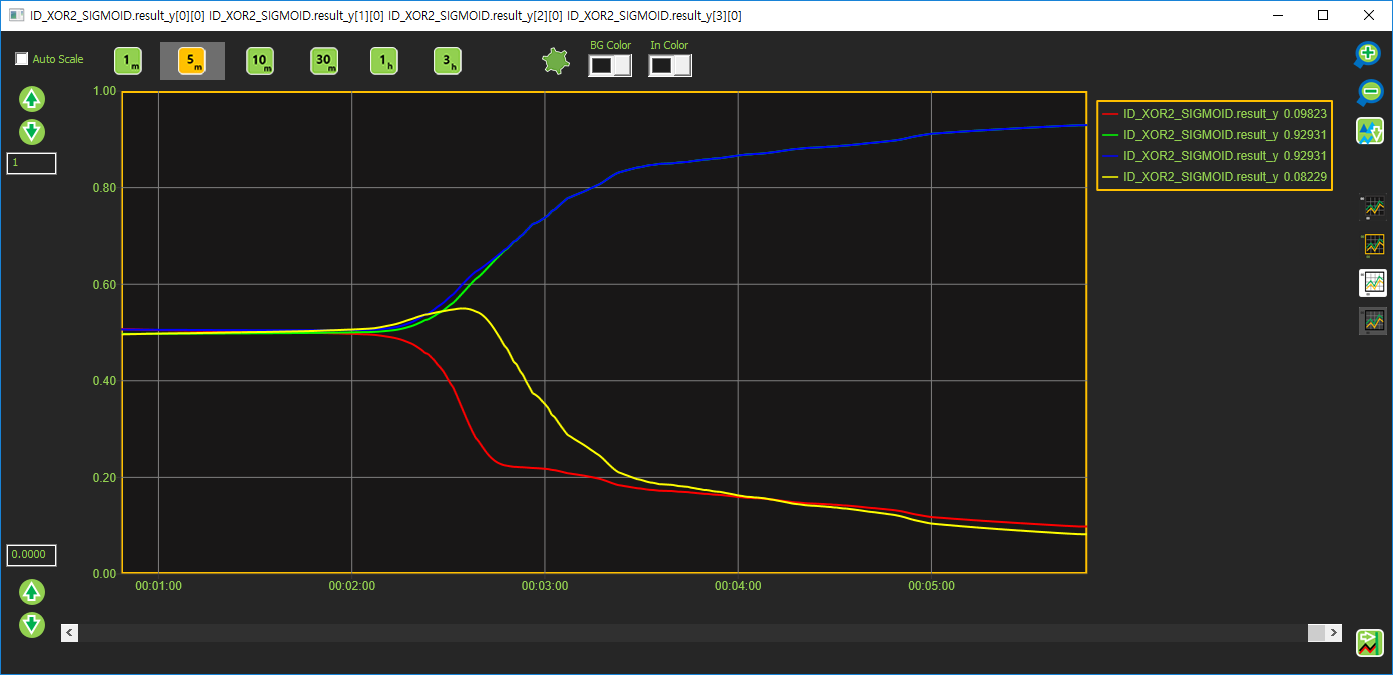
Cost 값
| Tensorflow r1.5 윈도우10에서 C++ 컴파일 수행기 (x64) (0) | 2017.12.19 |
|---|---|
| MNIST linear regression training 결과 (0) | 2017.12.08 |
| Tensorflow를 이용한 MNIST linear regression 구현 (그래픽 블럭-enuSpace) (1) | 2017.12.08 |
| Tensorflow를 이용한 GradientDescent 구현 (그래픽 블럭) (0) | 2017.10.20 |
| Tensorflow (r1.3) 윈도우10에서 C++ 컴파일 방법 (0) | 2017.08.22 |
SoftmaxCrossEntropyWidthLogits - Batch Size 10개, Train 20회 결과 (DataSet : 55000,개 TestSet : 10000개) learning rate = 0.001
정확도 : 87.72%
SoftmaxCrossEntropyWidthLogits - Batch Size 100개, Train 20회 결과 (DataSet : 55000,개 TestSet : 10000개) learning rate = 0.001
정확도 : 87.73%
Weight 3차원 결과값 (Range -1 ~ 1)
SoftmaxCrossEntropyWidthLogits - Batch Size 100개, Train 100회 결과 (DataSet : 55000,개 TestSet : 10000개) learning rate = 0.001
정확도 : 83.25%
Weight 3차원 결과값 (Range -1 ~ 1)
SoftmaxCrossEntropyWidthLogits - Batch Size 1000개, Train 20회 결과 (DataSet : 55000,개 TestSet : 10000개) learning rate = 0.001
정확도 : 89.04%
Weight 3차원 결과값 (Range -1 ~ 1)
SoftmaxCrossEntropyWidthLogits - Batch Size 1000개, Train 100회 결과 (DataSet : 55000,개 TestSet : 10000개) learning rate = 0.001
정확도 : 88.03%
Weight 3차원 결과값 (Range -1 ~ 1)
SoftmaxCrossEntropyWidthLogits - Batch Size 10000개, Train 20회 결과 (DataSet : 55000,개 TestSet : 10000개) learning rate = 0.001
정확도 : 90.63%
Weight 3차원 결과값 (Range -1 ~ 1)
SoftmaxCrossEntropyWidthLogits - Batch Size 10000개, Train 100회 결과 (DataSet : 55000,개 TestSet : 10000개) learning rate = 0.001
정확도 : 90.69%
Weight 3차원 결과값 (Range -1 ~ 1)
SoftmaxCrossEntropyWidthLogits - Batch Size 55000개, Train 20회 결과 (DataSet : 55000,개 TestSet : 10000개) learning rate = 0.001
정확도 : 80.57%
Weight 3차원 결과값 (Range -1 ~ 1)
SoftmaxCrossEntropyWidthLogits - Batch Size 55000개, Train 100회 결과 (DataSet : 55000,개 TestSet : 10000개) learning rate = 0.001
정확도 : 84.06%
Weight 3차원 결과값 (Range -1 ~ 1)
SoftmaxCrossEntropyWidthLogits - Batch Size 55000개, Train 1000회 결과 (DataSet : 55000,개 TestSet : 10000개) learning rate = 0.000001
정확도 : 90.20%
cost value : 0.75
Weight 3차원 결과값 (Range -1 ~ 1)
Weight 3차원 결과값 (Range -0.2 ~ 0.2)
SoftmaxCrossEntropyWidthLogits - Batch Size 10000개, Train 500회 결과 (DataSet : 50000,개 TestSet : 10000개) learning rate = 0.0001
정확도 : 91.60%
Weight 3차원 결과값 (Range -1 ~ 1)
| Tensorflow r1.5 윈도우10에서 C++ 컴파일 수행기 (x64) (0) | 2017.12.19 |
|---|---|
| enuSpace Tensorflow(텐서플로우)를 이용한 XOR 학습 구현 (0) | 2017.12.14 |
| Tensorflow를 이용한 MNIST linear regression 구현 (그래픽 블럭-enuSpace) (1) | 2017.12.08 |
| Tensorflow를 이용한 GradientDescent 구현 (그래픽 블럭) (0) | 2017.10.20 |
| Tensorflow (r1.3) 윈도우10에서 C++ 컴파일 방법 (0) | 2017.08.22 |
MNIST dataset을 이용하여 linear regression 알고리즘을 enuSpace-Tensorflow를 이용한 사용 방법을 설명합니다.
참고 : http://www.xiaoliangbai.com/2017/02/01/tensorflow-applying-linear-regression-on-mnist-dataset
import sys
import time
import numpy as np
import tensorflow as tf
import matplotlib.pyplot as plt
from tensorflow.examples.tutorials.mnist import input_data
%matplotlib inline

%load_ext autoreload
%autoreload 2

MNIST = input_data.read_data_sets("MNIST_data", one_hot=True)

# Define parameters for linear model
learning_rate = 0.01
batch_size = 128
n_epochs = 25

# Create placeholders
X = tf.placeholder(tf.float32, [batch_size, 784], name="image")
Y = tf.placeholder(tf.float32, [batch_size, 10], name="label")

# Create weights and bias
w = tf.Variable(tf.random_normal(shape=[784, 10], stddev=0.01), name="weights")
b = tf.Variable(tf.zeros([1,10]), name='bias')

# calculate scores
logits = tf.matmul(X, w) + b

# Entropy cost function and loss
entropy = tf.nn.softmax_cross_entropy_with_logits(logits, Y)
loss = tf.reduce_mean(entropy)

# Define optimizer
optimizer = tf.train.GradientDescentOptimizer(learning_rate=learning_rate).minimize(loss)

# Run optimization and test
loss_history = []
acc_history = []
init = tf.global_variables_initializer()
with tf.Session() as sess:
    sess.run(init)
    n_batches = int(MNIST.train.num_examples/batch_size)
    for i in range(n_epochs):
        for _ in range(n_batches):
            X_batch, Y_batch = MNIST.train.next_batch(batch_size)
            _, loss_value = sess.run([optimizer, loss], feed_dict={X: X_batch, Y:Y_batch})
        loss_history.append(loss_value)

        # Check validation accuracy
        n_v_batches = int(MNIST.validation.num_examples/batch_size)
        total_correct_preds = 0
        for j in range(n_v_batches):
            X_batch, Y_batch = MNIST.validation.next_batch(batch_size)
            _, loss_batch, logits_batch = sess.run([optimizer, loss, logits], feed_dict={X: X_batch, Y:Y_batch})
            preds = tf.nn.softmax(logits_batch)
            correct_preds = tf.equal(tf.argmax(preds, 1), tf.argmax(Y_batch, 1))
            accuracy = tf.reduce_sum(tf.cast(correct_preds, tf.float32))
            total_correct_preds += sess.run(accuracy)
        validation_accuracy = total_correct_preds/MNIST.validation.num_examples
        acc_history.append(validation_accuracy)


    # Test the model
    n_batches = int(MNIST.test.num_examples/batch_size)
    total_correct_preds = 0
    for i in range(n_batches):
        X_batch, Y_batch = MNIST.test.next_batch(batch_size)
        logits_batch = sess.run(logits, feed_dict={X: X_batch, Y:Y_batch})
        preds = tf.nn.softmax(logits_batch)
        correct_preds = tf.equal(tf.argmax(preds, 1), tf.argmax(Y_batch, 1))
        accuracy = tf.reduce_sum(tf.cast(correct_preds, tf.float32))
        total_correct_preds += sess.run(accuracy)

    print "Test accuracy is {0}".format(total_correct_preds/MNIST.test.num_examples)
아래 그리픽 모델은 SoftmaxCrossEntropyWidthLogits 객체를 이용하여 그래픽 블럭을 이용하여 각 객체의 핀정보에 대하여 연결선을 수행한 화면이다.
아래 그래픽 모델은 Subtract객체를 이용하여 그래픽 블럭을 이용하여 각 객체의 핀정보에 대하여 연결선을 수행한 화면이다.
각 블럭중 데이터셋을 불러와 전달을 수행하기 위한 FIFOQueue , FIFOEnqueue를 활용한다. 한번에 불러올 이미지의 배치 사이즈를 설정한다. 본 모델은 100개를 적용하였다.
불러온 이미지 데이터 셋을 이용하여 Weight변수와 Bias변수를 생성하여 Training 수행
Traing 결과 저장
Training을 특정 개수에 도달하면, Weight와 Bias의 텐서값을 저장하기 위하여 아래그림과 같이 구성하였다.
앞에서 저장된 Weight, Bias의 값을 이용하여 평가를 수행하는 모델이다.
평가를 수행하기 위해서 평가용 데이터셋의 파일 위치를 지정하여 매 실행마다 불러오기를 수행한다.
앞 Training Model에서 저장한 Weight, Bias 텐서값을 불러오는 불럭이다.
평가용 데이터셋과 Weight, bias값을 불러왔다면 평가를 수행한다.
평가 결과를 출력하기 위하여 Counter와 판정결과값을 확인하기 블럭을 구성하였다.
Training 과정을 확인하기 위해서 Weight값을 3차원으로 확인하기 위한 픽쳐를 생성하여 실시간 변화정보에 대하여 확인한다.
SoftmaxCrossEntropyWidthLogits 이용한 모델 결과
Subtract 이용한 모델 결과.
| enuSpace Tensorflow(텐서플로우)를 이용한 XOR 학습 구현 (0) | 2017.12.14 |
|---|---|
| MNIST linear regression training 결과 (0) | 2017.12.08 |
| Tensorflow를 이용한 GradientDescent 구현 (그래픽 블럭) (0) | 2017.10.20 |
| Tensorflow (r1.3) 윈도우10에서 C++ 컴파일 방법 (0) | 2017.08.22 |
| enuSpace for jupiter deep learning(tensorflow) plugin project 오픈소스 생성 (0) | 2017.07.12 |
Gradient Descent 알고리즘을 enuSpace-Tensorflow를 이용하여 실행 결과입니다.
enuSpace-Tensorflow는 C++ 기반의 API를 이용하여 그래픽 블럭으로 구성되었습니다. Tensorflow의 C++ API를 이용하여 구현하시는 분은 아래링크를 참고하세요.
API 가이드 : https://expnuni.gitbooks.io/enuspacetensorflow/content/
참고 : https://hunkim.github.io/ml/ (모두를 위한 머신러닝/딥러닝 강의)
import tensorflow as tf

x_data = [1., 2., 3.]
y_data = [1., 2., 3.]

W = tf.Variable(tf.random_uniform([1],-10.0, 10.0))

X = tf.placeholder(tf.float32)
Y = tf.placeholder(tf.float32)

hyphothesis = W * X

cost = tf.reduce_mean(tf.square(hyphothesis - Y))

descent = W - tf.mul( 0.1, tf.reduce_mean(tf.mul( (tf.mul(W,X)-Y), X ) ))

init = tf.initialize_all_variables()

sess = tf.Session()
sess.run(init)

for step in range(20):
    sess.run(W.assign(descent), feed_dict={X:x_data, Y:y_data})
    print( step, sess.run(cost, feed_dict={X:x_data, Y:y_data}), sess.run(W))
Tensorflow의 그래픽 컴포넌트를 이용하여 위와 동일한 코드를 그래픽 컴포넌트를 이용하여 로직을 구성하여 실행한 결과는 아래 그림과 같다.
X의 초기값에 {1.0f, 2.0f, 3.0f} 입력시 출력 Y {1.0f, 2.0f, 3.0f}에 해당하는 W값을 구현하는 로직이다.
자세한 알고리즘에 대한 설명은 https://hunkim.github.io/ml/ (모두를 위한 머신러닝/딥러닝 강의)를 참고하시기 바랍니다.
ApplyGradientDescent Equation (var = var - alpha*delta)
아래의 테이블의 값을 이용하여 W, b의 찾기 위한 그래픽 블럭을 구성하여 예상된 가중치와 바이어스값을 확인.
| X1 | X2 | X3 | Y |
|---|---|---|---|
| 1 | 5 | 21 | 79 |
| 15 | 12 | 22 | 110 |
| 35 | 13 | 23 | 135 |
| 4 | 45 | 24 | 171 |
| 5 | 15 | 53 | 199 |
| 6 | 44 | 7 | 120 |
| 12 | 17 | 27 | 132 |
| 6 | 20 | 28 | 135 |
H(x1, x2, x3) = x1w1 + x2w2 + x3w3
x_data = [[1., 5., 21.], [15., 12., 22.],
         [35., 13., 23.], [4., 45., 24.], [5., 15., 53.],
         [6., 44., 7.], [12., 17., 27.], [6., 20., 28.]]
y_data = [[79.], [110.], [135.], [171.], [199.], [120.], [132.], [135.]]


# placeholders for a tensor that will be always fed.
X = tf.placeholder(tf.float32, shape=[None, 3])
Y = tf.placeholder(tf.float32, shape=[None, 1])

W = tf.Variable(tf.random_normal([3, 1]), name='weight')
b = tf.Variable(tf.random_normal([1]), name='bias')

# Hypothesis
hypothesis = tf.matmul(X, W) + b
W1, W2, W3의 값이 1, 2, 3의 값으로 수렴, Bias 값 5로 수렴
X = {{1,5,21},{15,12,22},{35,13,23},{4,45,24},{5,15,53},{6,44,7},{12,17,27},{6,20,28}}
Y = {{79 },{110},{135},{171},{199},{120},{132},{135}}
W 초기값 = {{1.5,3.5,0.5}}
b 초기값 = {{0.5}}
ApplyGradientDescent alpha 값 = 0.001
| MNIST linear regression training 결과 (0) | 2017.12.08 |
|---|---|
| Tensorflow를 이용한 MNIST linear regression 구현 (그래픽 블럭-enuSpace) (1) | 2017.12.08 |
| Tensorflow (r1.3) 윈도우10에서 C++ 컴파일 방법 (0) | 2017.08.22 |
| enuSpace for jupiter deep learning(tensorflow) plugin project 오픈소스 생성 (0) | 2017.07.12 |
| Tensorflow 라이브러리를 이용하여 Windows Third party 응용프로그램 빌드를 위한 환경 설정 (0) | 2017.05.17 |
Tensorflow r1.3 윈도우10에서 C++ 컴파일 수행기 (x64)
enuSpace for jupiter - work note
Tensorflow r1.3을 이용한 Third party 프로그램 개발에 있어 소스 빌드과정에 대한 수행 내용이다.
Tensorflow r1.3 컴파일 공식 페이지
https://github.com/tensorflow/tensorflow/blob/r1.3/tensorflow/contrib/cmake/README.md
Step by Step
Run cmd (컴파일 환경 설정)
- D:\Workspace>"C:\Program Files (x86)\Microsoft Visual Studio 14.0\VC\bin\amd64\vcvars64.bat"
CMake and git Path 추가 (Cmd 창에서 명령 수행이 가능하도록 패스추가)
- D:\Workspace>set PATH=%PATH%;C:\Program Files\Git\bin\
cmake .. -A x64 -DCMAKE_BUILD_TYPE=Release ^
-DSWIG_EXECUTABLE=D:/Workspace/swigwin-3.0.10/swigwin-3.0.10/swig.exe ^
-DPYTHON_EXECUTABLE=C:/Anaconda3/python.exe ^
-DPYTHON_LIBRARIES=C:/Anaconda3/libs/python35.lib ^
-Dtensorflow_ENABLE_GPU=ON ^
-DCUDNN_HOME="D:\Workspace\cudnn-8.0-windows10-x64-v5.1\cuda" ^
-Dtensorflow_WIN_CPU_SIMD_OPTIONS=/arch:AVX
MSBuild /p:Configuration=RelWithDebInfo ALL_BUILD.vcxproj텐서플로우 실행 절차에 수행시 error : new line constant 에러가 발생합니다.
아래와 같이 조치를 수행합니다.
-----------------------------------------------------------------------------------------------
build\re2\src\re2\CMakeLists.txt 파일 오픈 수행후 AdditionalOptions 을 추가합니다. (/source-charset:utf-8)
# Copyright 2015 The RE2 Authors. All Rights Reserved.
# Use of this source code is governed by a BSD-style
# license that can be found in the LICENSE file.
# Old enough to support Ubuntu Trusty.
cmake_minimum_required(VERSION 2.8.12)
project(RE2 CXX)
include(CTest)
option(BUILD_SHARED_LIBS "build shared libraries" OFF)
option(USEPCRE "use PCRE in tests and benchmarks" OFF)
# CMake seems to have no way to enable/disable testing per subproject,
# so we provide an option similar to BUILD_TESTING, but just for RE2.
option(RE2_BUILD_TESTING "enable testing for RE2" ON)
set(EXTRA_TARGET_LINK_LIBRARIES)
if(CMAKE_CXX_COMPILER_ID MATCHES "MSVC")
if(MSVC_VERSION LESS 1800)
message(FATAL_ERROR "you need Visual Studio 2013 or later")
endif()
if(BUILD_SHARED_LIBS)
# See http://www.kitware.com/blog/home/post/939 for details.
cmake_minimum_required(VERSION 3.4)
set(CMAKE_WINDOWS_EXPORT_ALL_SYMBOLS ON)
endif()
# CMake defaults to /W3, but some users like /W4 (or /Wall) and /WX,
# so we disable various warnings that aren't particularly helpful.
add_compile_options(/source-charset:utf-8 /wd4100 /wd4201 /wd4456 /wd4457 /wd4702 /wd4815)
elseif(CMAKE_CXX_COMPILER_ID MATCHES "GNU|Clang")
add_compile_options(-std=c++11)
endif()
RELEASE용 컴파일 수행합니다.
D:\...\build> MSBuild /p:Configuration=Release tf_tutorials_example_trainer.vcxproj
D:\...\build> Release\tf_tutorials_example_trainer.exe| Tensorflow를 이용한 MNIST linear regression 구현 (그래픽 블럭-enuSpace) (1) | 2017.12.08 |
|---|---|
| Tensorflow를 이용한 GradientDescent 구현 (그래픽 블럭) (0) | 2017.10.20 |
| enuSpace for jupiter deep learning(tensorflow) plugin project 오픈소스 생성 (0) | 2017.07.12 |
| Tensorflow 라이브러리를 이용하여 Windows Third party 응용프로그램 빌드를 위한 환경 설정 (0) | 2017.05.17 |
| Tensorflow (r1.1) 윈도우10에서 C++ 컴파일 방법 (0) | 2017.05.16 |
enuSpace for jupiter 개발 이야기
tensorflow 버젼 : r1.2
enuSpace for jupiter 버젼에서는 외부 모듈과 연동하기 위한 plugin 기능이 추가됩니다.
Deep learning 오픈 플랫폼 tensorflow와 연동하기 위한 공개 소프트웨어 저장소를 생성하였습니다.
Project 주소(github) : https://github.com/EXPNUNI/enuSpaceTensorflow
Tensorflow C++ API Guide
#include "tensorflow/cc/client/client_session.h"
#include "tensorflow/cc/ops/standard_ops.h"
#include "tensorflow/core/framework/tensor.h"

int main()
{
  using namespace tensorflow;
  using namespace tensorflow::ops;
  Scope root = Scope::NewRootScope();

  // Matrix A = [3 2; -1 0]
  auto A = Const(root, { {3.f, 2.f}, {-1.f, 0.f}});

  // Vector b = [3 5]
  auto b = Const(root, { {3.f, 5.f}});

  // v = Ab^T
  auto v = MatMul(root.WithOpName("v"), A, b, MatMul::TransposeB(true));
  std::vector outputs;
  ClientSession session(root);

  // Run and fetch v
  TF_CHECK_OK(session.Run({v}, &outputs));

  // Expect outputs[0] == [19; -3]
  LOG(INFO) << outputs[0].matrix();
  return 0;
}
위와 같이 C++를 이용하여 Tensorflow 코드를 짜야 했던 내용을 enuSpace에서 아래 그림과 같이 로직 블럭을 drag & drop으로 구성하고 연결선을 이용하여 코드를 제작합니다.
위 프로그램은 실제 Const 입력값에 따라서 MatMul 블럭의 Operation을 수행하여 연산 결과를 출력하는 동작 화면입니다.
현재단계는 Tensorflow와 메모리 연동에 대한 소프트웨어 설계 및 기초 구현이 되었습니다.
enuSpace for jupiter 버젼의 진화과정을 github에서 확인하실 수 있습니다. 많은 관심 부탁드립니다.
https://github.com/EXPNUNI/enuSpaceTensorflow
-이엔유 주식회사 developer team -
| Tensorflow를 이용한 MNIST linear regression 구현 (그래픽 블럭-enuSpace) (1) | 2017.12.08 |
|---|---|
| Tensorflow를 이용한 GradientDescent 구현 (그래픽 블럭) (0) | 2017.10.20 |
| Tensorflow (r1.3) 윈도우10에서 C++ 컴파일 방법 (0) | 2017.08.22 |
| Tensorflow 라이브러리를 이용하여 Windows Third party 응용프로그램 빌드를 위한 환경 설정 (0) | 2017.05.17 |
| Tensorflow (r1.1) 윈도우10에서 C++ 컴파일 방법 (0) | 2017.05.16 |
enuSpace for mars - Tutorial Guide
- enuSpace를 이용한 HMI 라이브러리 생성 및 적용 방법 (1/2)
- enuSpace를 이용한 HMI 라이브러리 생성 및 적용 방법 (2/2)
5. LOGIC 프로그래밍, HMI라이브러리 인터페이스 방법
6. enuSpace 시뮬레이션 및 Data Visualization 사용방법
7. Trend 객체와 히스토리 Popup Trend 사용방법
| Trend(차트) 객체와 히스토리 Popup Trend(팝업 차트) 사용방법 (0) | 2017.06.02 |
|---|---|
| enuSpace Web 연동 및 사용방법 (0) | 2017.04.25 |
| IoT Platform 사용방법 (enuSpace for mars) (0) | 2017.04.25 |
| enuSpace 시뮬레이션 및 Data Visualization 사용방법 (0) | 2017.04.25 |
| LOGIC 프로그램밍, HMI라이브러리 인터페이스 방법 (0) | 2017.04.24 |


